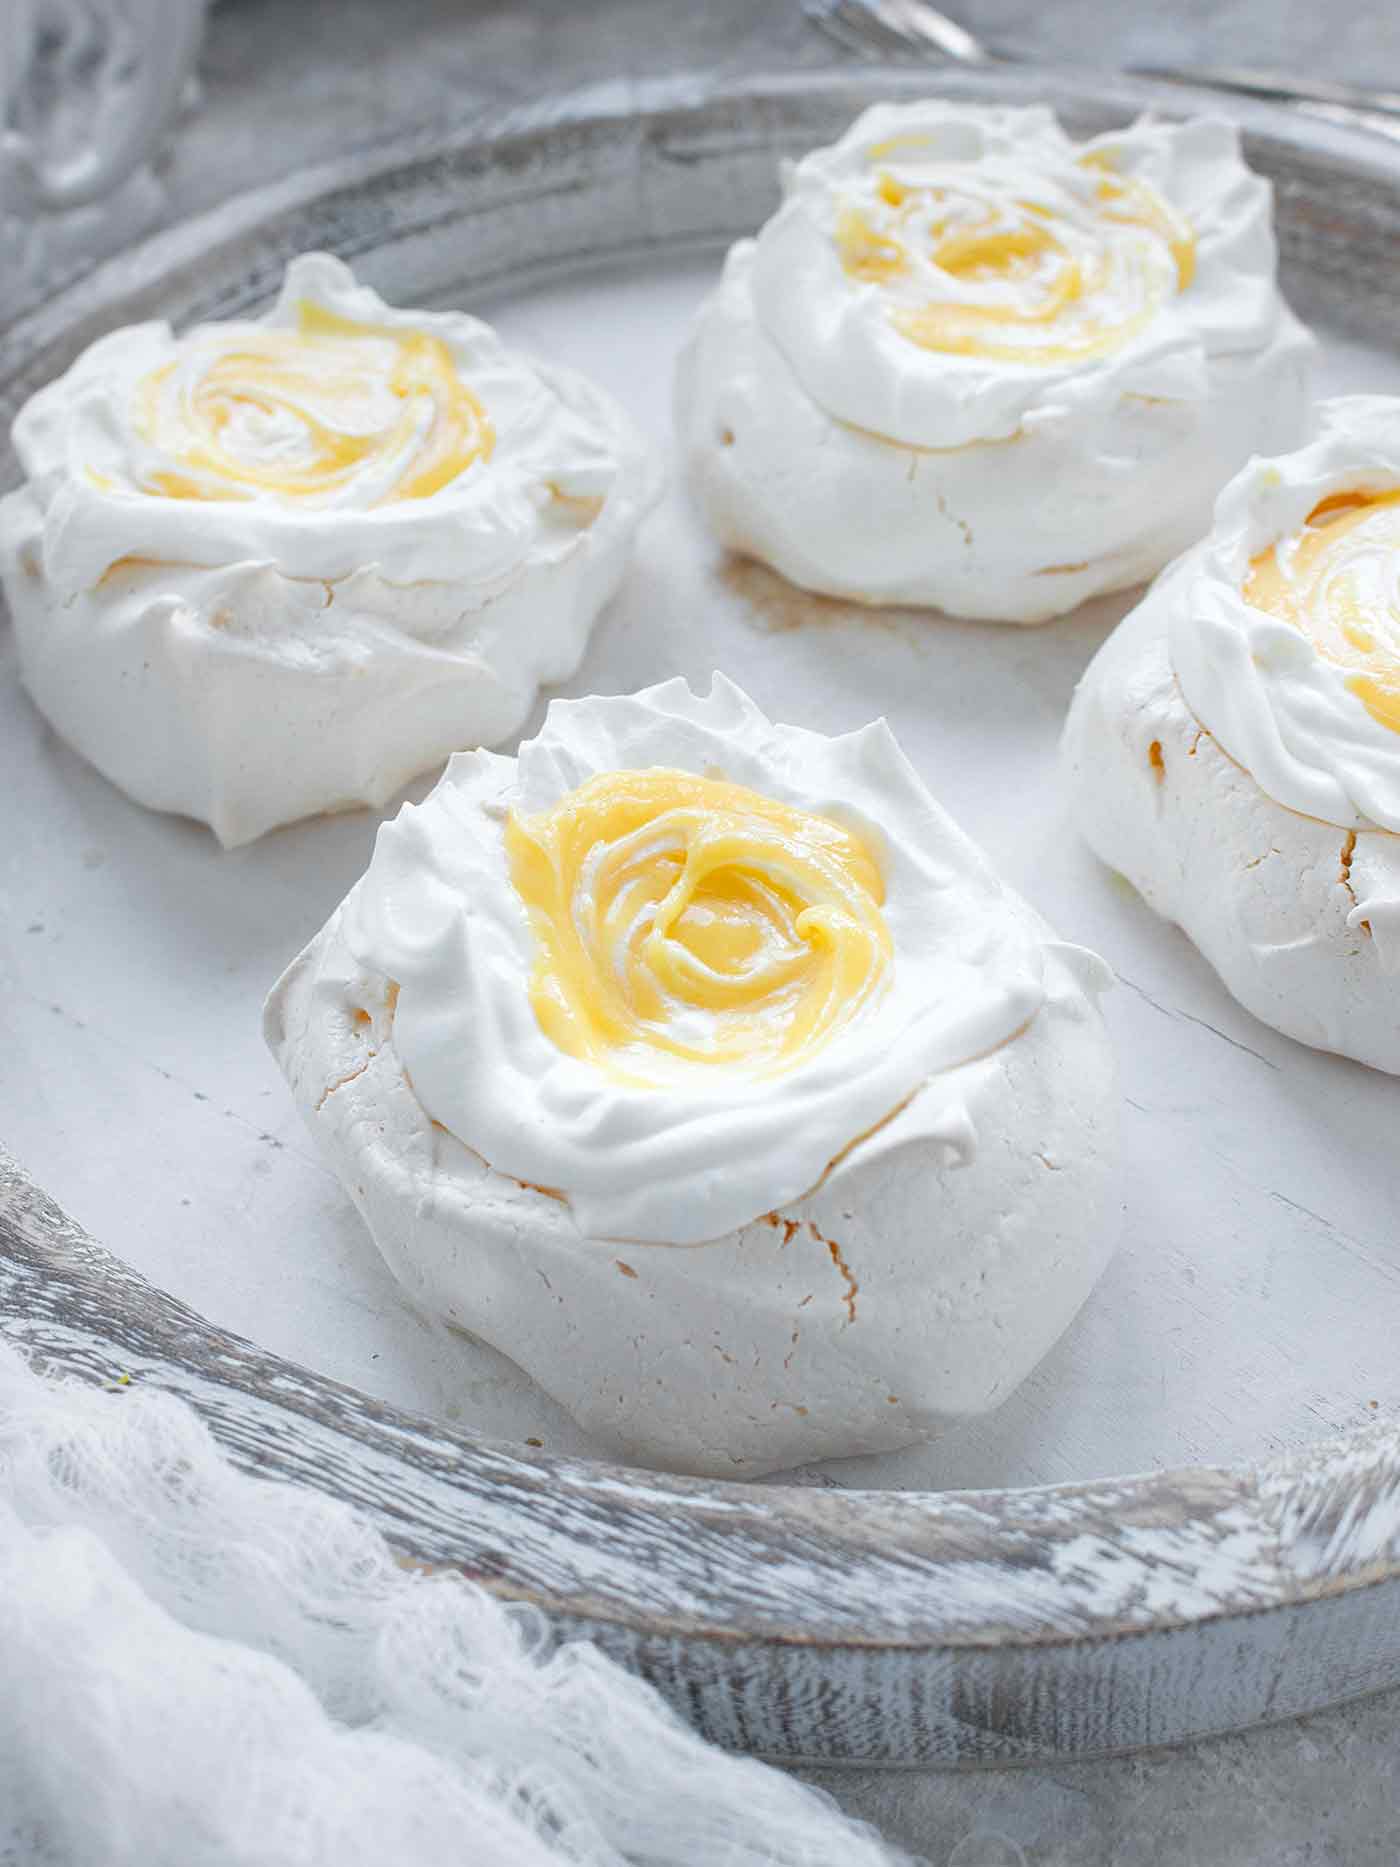
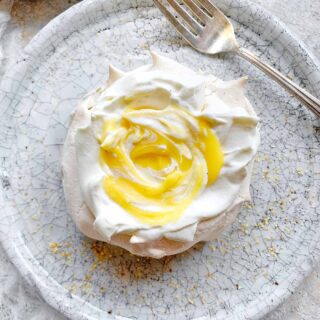
Light and marshmallowy, tender on the inside and crispy on the outside, mini pavlovas are the perfect airy, sweet dessert. Topped with a swirl of fresh whipped cream and homemade tangerine curd, these pavlovas are as beautiful as they are tasty. {Vegetarian, gluten-free}

Last fall, I got hooked on watching Nigella Lawson’s PBS show, “At My Table,” and became hopelessly smitten with her glorious, cake-sized rose Pavlova (Season 1, Episode 5).
This started a many months-long — and ongoing, actually — fascination with this dessert, experimenting almost every weekend to understand its mysterious structure and impossible texture.
I’ve made meringues before, of course, both as pie toppings and as cookies, but pavlovas have their own unique charms, and they’ve quickly become my favorite sweet treat. Even now, in the heart of winter, where something as ethereal as a pavlova seems out of step with thick and hearty comfort food soups.
What are pavlovas?
Pavlovas are a type of meringue, whose invention is contentiously claimed by both Australia and New Zealand (although they agree that they were named after the Russian ballerina, Anna Pavlova, inspired by her tutu).
Both pavlovas and meringues start with egg whites and sugar as their base, but then pavlovas use an acid and cornstarch to set up and create an amazing, marshmallowy interior. Meringues are often cooked using the Swiss technique before whipping (cooking the egg whites and sugar over a bain marie), but that’s not necessary with pavlovas.
Meringues, by the themselves, are insubstantial with little flavor (IMO), but are big on aesthetics — there’s nothing quite like a lemon pie with a spiky cloud of toasted meringue on top — whereas pavlovas have both taste and texture.
Pavlovas are wonderfully airy and lightly sweet. They’re a spot-on, end-of-meal dessert, when you’re already full and don’t want to be overwhelmed by something heavy, like brownies or cheesecake.
They’re especially perfect for someone like me, whose tastes drift further away every year from sweet tooth to salty-savory. The marshmallow interior with the crispy, shattery exterior, topped with whipped cream and fruit, is just the most delightful morsel ever.

How to make perfect pavlovas
“Perfect” is a relative term here, I’ll caution. Part of the pavlova’s charms is that it’s perfectly imperfect. The sticky meringue is difficult to corral and shape. The pavlovas bake up into puffy pillows … and then crack and chip in mercurial ways.
Their flaws are easily overlooked, however, because the result is so sensational. If you forgive the stubbornness of the meringue, you’ll be pleased with just how easy they are to make. Whipped egg whites inspire fear and dread in some, but there’s no need. A few key tips will guide you to success:
- One common cause of deflated egg whites is fatty residues, either from something on the bowl, or bits of yolk in the whites. Make sure your mixing bowl is sparklingly clean: wash it thoroughly before starting (even if it’s already “clean” from the last time you used it) and dry. Then swirl a splash of vinegar around the bowl, rinse, and dry again. I usually pour a bit of vinegar on a paper towel, wipe down the bowl, and then use a dry paper towel to go over it again (without rinsing). Don’t forget to clean the whisk attachment, too.
- Egg separating tip: if you don’t have an egg separating gadget, and if you’re not confident in your egg separating skills, use a small bowl, not your mixer bowl, to catch the egg whites. Separate the egg whites and yolk of the first egg, whites in the small bowl, yolk still in the shell. If the separation was clean, pour the egg white into the mixing bowl. Repeat with each egg, one at a time. That way, if you get yolk into the egg whites, you’ll only lose that one, and not the whole batch of egg whites (been there, done that!)
- We whip the egg whites in two stages: the first, until soft, foamy peaks are reached. This only takes a few minutes. Then we begin adding the sugar, one tablespoon at a time, until the egg whites are pillowy and hold stiff peaks. Depending on the age of the eggs, this could take up to 10 minutes.
- You can test the “stiff peak” readiness in two ways: Stop the mixer and (1) remove the whisk attachment from the stand mixer, dip the whisk into the egg whites and pull straight up. The peak in the bowl should be tall and well-defined. Then, invert the whisk and watch the peak at the tip. It should either hold pointy and firm, or slump just slightly. It should not fold over on itself like a paperclip. Or (2) tilt mixer bowl upside-down. The egg whites should hold firm and not threaten to plop out of the bowl. (Obviously, you’ll want to be very confident that the egg whites are stiff before attempting that 😉 )
- If you can find it, use superfine sugar (a scant cup, rather than a full cup). It’s not the same as confectioner’s sugar, rather, it’s still granulated but in much smaller crystals. Superfine sugar will dissolve more quickly into the egg whites and will reduce the chance of the pavlovas weeping later on.
- When you add the vinegar, cornstarch, and vanilla, you can either fold it in by hand with a spatula, or whisk on low speed with the mixer. I usually prefer the latter, because it happens very quickly and there’s less chance of deflating the egg whites. Either way, the egg whites will be ever-so-slightly looser, but still thick and beautiful and glossy.
- Spoon the meringue onto prepared baking sheets in generous mounds. I love the look of tall mini pavlovas, so I don’t spread them flat, although you certainly can.
- To create craters, use a small spoon (like an iced tea spoon) to first dip down into the center of the mound, and then push slightly outward towards the edge and pull up (see photo above). Repeat, moving around in a circle. This will help keep height to the mini pavlova. If you try to create the well with side-to-side motions, you’ll just end up spreading the meringue into a wider circle.
- Before placing in the oven, check the pavlovas for stray smears or strands or points, and smooth them out, if you like. The pavlovas will bake up exactly as they appear on the sheet.
- No matter how tempting, don’t open the oven door while the pavs are baking. They need consistent heat to do their thing.
- The cooling period in the oven is very important, as this is the stretch where they’ll firm up. Patience is in order, Grasshopper, as the pavlovas must be completely cool before handling.
- Note that for these mini pavlovas, I’m using Nigella’s baking temperature and time (300°F at 30 minutes, with a 30 minute cooling period). If were making a cake-sized pavlova, I would use a much lower temperature for a longer time (200°F for an hour-ish, with a 30-minute or longer cooling period).

Tangerine Curd
Pavlovas are traditionally served topped with juicy summer berries. But mid-winter is not the time to put strawberries and raspberries into such noble service.

Instead, I turned to seasonal fruit, and created a curd from bright and tangy-sweet tangerines. Swirled with fresh whipped cream, this combination sits gracefully atop each vanilla-kissed mini pavlova and creates a bite that’s tenderly marshmallowy, light, and orange dream creamy.
Making a curd here also appeals to my no-waste sensibilities: the pavlovas need four egg whites, while the curd needs four egg yolks. Together, they create one sensational dessert.

You’ll have leftover curd, if you use the tangerine curd as I have here in the photos, swirling a teaspoon’s worth into the whipped cream. I think it’s the perfect balance of airy, sweet, and tangy. Spoon the extra curd into your morning yogurt, spread it on a stack of pancakes, or top a slice of French toast with a big dollop. It will hold in the fridge for a week or more.
But, you can, of course, switch up the process, and first fill the pavlova’s craters with the tangerine curd, and then swirl a bit of the whipped cream into it. Whatever your tastes prefer, it’s all good.
Tips for handling and serving mini pavlovas
- Mini pavlovas are very fragile, so avoid putting any pressure on their tops or sides. To pick up or move a mini pavlova, use a thin spatula, or, use your fingertips to gently scoop it up from the bottom edges. Don’t pick one up by grasping the sides, as you’ll likely crush the pavlova.
- When spooning the whipped cream and tangerine curd onto the pavlova, try to keep the spoon or utensil from touching the pavlova: it’s just another opportunity to crack the shell. When spreading the whipped cream, use a light hand and float the spoon above the shell.
- But, no matter how careful you are, pavlovas are going to crack. It’s their nature. Don’t fret the cracks.
As an alternative to untidy spooning of the meringue onto the baking sheet, you can fill a piping bag and, with a large tip, pipe the meringue into neat, orderly nests.
But, to appreciate the unfettered spirit of the pavlova, I hope you’ll try them freehand first. Pavlovas, like life, are messy and imperfect, hard and soft at once. They stand tall even as they show cracks and fall in on themselves. Trying to pipe them into perfection is to go against their very nature. They belong to the untamed geometry of swirls and peaks and crevices.
They also belong in your belly.
Karen xo
Mini Pavlovas with Tangerine Curd
Ingredients
for the pavlovas
- 4 egg whites
- 1 cup sugar (or a scant cup of superfine sugar)
- pinch of fine salt
- 2 teaspoons white wine vinegar
- 2 teaspoons corn starch
- 1 teaspoon vanilla paste or extract
for the tangerine curd
- 4 egg yolks
- 1/3 cup granulated sugar
- pinch of salt
- grated zest from 1 tangerine
- 1/2 cup tangerine juice (you'll need 2 to 4 tangerines, depending on variety and size)
- 1 tablespoon lemon juice
- 6 tablespoons unsalted butter
for the whipped cream
- 1 1/2 cups heavy cream
- 1/4 cup granulated sugar
- 1/2 teaspoon vanilla extract or paste, optional
- chilled bowl and whisk, if possible
Instructions
for the pavlovas:
- Preheat oven to 300 degrees F. Position the racks in the upper and lower thirds.
- Cut a piece of parchment to fit a large baking sheet. Trace 4" circles, at least 2" apart on one side of the parchment (use a large a large biscuit cutter or canning lid jar - they might short of 4", but they'll serve great as a guide). Flip the paper over, penciled side down, on the baking sheet and set aside.
- Thoroughly clean the bowl of a stand mixer. Rinse with a little vinegar and wipe dry.
- Add the egg whites and salt to the bowl*, affix the whisk attachment, and start the mixer on medium-speed until the egg whites begin to turn a more opaque white, then increase speed to medium-high until soft/medium peaks are reached. Check by stopping the mixer and lifting the whisk attachment to inspect the peak on the whisk. It won't be stiff, but it won't drip, either. It takes just a couple of minutes).
- Resume whipping at high speed and slowly add the sugar. (I usually add it by the heaping tablespoon; let it mix, then add the next.) Continue whipping until the meringue is very pillowy in the bowl. Stop the mixer, and remove the whisk. The egg whites should be very stiff, smooth, glossy, and pillowy, and hold a thin peak when the whisk is turned upside down. You can also test the bowl: remove the bowl from the mixer and turn it upside - the egg whites shouldn't budge.
- Add the vinegar, corn starch, and vanilla to the meringue. Whisk on slow very briefly until combined (this happens fast). The meringue will be slightly looser and very glossy.
- Use a large spoon to divide the meringue evenly among the 8 circles, piling the meringue tall in the center of each.
- Use a small spoon or offset spatula to begin creating a crater in the meringue by dabbing it down in the center and pulling up to create a rim. I prefer some height to my mini pavlovas, so I don't fill the traced circle with meringue, rather, I use the tracing as a guide to keep my pavlovas round.
- Gently smooth out any weird bumps or strands, keeping in mind that the pavlova will bake up exactly as it looks, bumps and all.
- Place the baking sheet on the lower oven rack, and bake for 30 minutes undisturbed.
- Turn off the stove, open the door for a few seconds to let the the most intense heat vent, close the door and let the pavlovas rest in the cooling oven for another 30 minutes. This is when the pavlovas will set up and form the crisp shell.
for the tangerine curd:
- Heat a medium, heavy-bottom sauce pan over low, and add the tangerine juice, lemon juice, sugar, egg yolks, and salt, and whisk well, until the egg yolks have smoothed out (the mixture will still appear a bit broken - that's okay). Add the zest and the butter, and stir constantly until the butter melts (this will take several minutes). The butter will emulsify the lemon and eggs, creating a smooth, golden solution.
- Increase heat to medium-low. Stir constantly to prevent the eggs from setting up. Keep stirring until the mixture thickens and begins to resemble a creamy jelly. This will take about 10 minutes. If you have an instant read thermometer, you're looking for the curd to reach 170°F. The curd should lift and then fall - not drip or drizzle - from the whisk or spatula.
- Strain the curd through a fine mesh strainer over a bowl. (Use a spatula to push the mixture through the mesh.) Let the curd cool. (Accelerate the cooling process by placing the bowl in a larger bowl half-filled with ice water.)
- Curd can be made ahead: refrigerate the curd for up to 2 weeks.
for the whipped cream:
- Just before serving, pour the heavy cream into the bowl of a stand mixer and, using the whisk attachment, whip at medium-high speed.
- When the cream starts to thicken (the whisk will leave light tracks as it spins), add the sugar and vanilla (if using).
- Continue whipping until the cream is pillowy and forms soft/medium peaks. Use immediately**.
assemble the pavlovas:
- Very gently, fill and spread the whipped in the pavlova's crater. Spoon a heaping teaspoon full of curd in the center, and use a knife to swirl the curd through the whipped cream. Repeat with the remaining pavlovas. Serve immediately.
Notes
Nutrition
Pin Mini Pavlovas with Tangerine Curd recipe for later:
Pinterest fans, if you’d like to save this recipe for later, use these images (or any image above) to pin to your boards (they’re small here, but thanks to the magic of the interwebs, they’ll be full size when you pin them). Thanks for sharing, and most of all, thank you so much for reading this post! Blogging wouldn’t be any fun without you!

