
New Orleans’ iconic Muffuletta sandwich gets a delightful mini makeover! These slider versions are bursting with a delicious fusion of Italian flavors, including olive salad, rich cheeses, and savory, cured meats, all nestled in soft Hawaiian rolls and baked until toasty. Perfect for party appetizers, game day snack, Mardi Gras finger foods, these Muffuletta Sliders are sure to be a crowd-pleaser any time you crave a taste of the Big Easy.

Possibly the funnest of fun party foods, these hefty sliders are no wimpy bites of bread and filling. Stacked high with an Italian cured meats lover’s selection of cold cuts and cheese, each bite is further turbo-charged by a briny layer of olive salad.
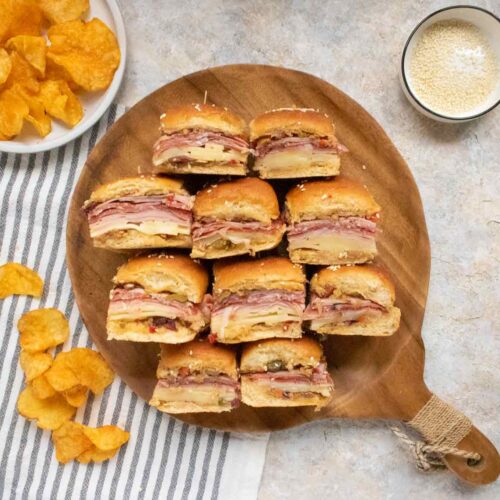
They’re so easy to make — minimal prep; just layer on the ingredients and bake — and they’re attractive and impressive and crave-worthy on the serving platter.
Ingredients Notes and Substitutions
Slider buns — If your slider buns are not already split, you’ll need to slice the buns in half through the center. Brands like King’s Hawaiian are easy to slice because the buns are attached in one big block. If you have a long, serrated bread knife, you can set up height guides — like long-handled wooden spoons — on either side of the bun block to help get a clean, even cut through the buns, leaving the tops attached to each other, and the bottoms attached to each other. This makes it super quick to spread the olive salad on the bread.
Olive salad — I think it could be successfully argued that the olive salad is the most important part of a Muffuletta sandwich — it adds such a distinct, briny flavor to the meats. I haven’t included a recipe for olive salad here because a prepared version was so easy to find at Kroger. Even here in my northern region. My Kroger has a Murray’s Cheese station inside, and they sell a Muffuletta Olive Salad. But I also found jars of Italian olive salad in the pickle aisle.
You can also buy it on Amazon. If you’re interested in making a homemade version, I’d go with Serious Eats’ version, although you still have to buy giardiniera (pickled vegetables), which hopefully is not a regional thing.

Savory Meats — There doesn’t seem to be a clear historical rule for which cold cuts you should use for an authentic Muffuletta. But here I’ve used Mortadella, Speck, ham, and Sopressata salami. Don’t not make the sandwich because your grocery store doesn’t carry everything. The Muffuletta has roots in Italian grinders, so I think the typical deli will give you lots of leeway to reproduce the general spirit of the sandwich.
At the very least, you should be able to find prosciutto, ham, and a nice salami, which would be perfect.
Cheeses — Swiss and provolone are the great cheeses for these sliders. They’re both melty and have flavors that will complement the deli meats.

How to Make Muffuletta Sliders — a Visual Guide
Here’s the overview for making the sliders, with helpful photographs. Don’t forget to review the recipe card below for full instructions and ingredient amounts to ensure you have everything prepped.
Step 1: Prepare the slider buns
Most slider buns need to be sliced in half across the equator. Keep the individual buns attached to each other, if they already are. Use a large, serrated knife in your dominant hand while pressing down lightly on the buns with the other. Keep the blade even with the surface to make as straight and even a cut as possible.

Carefully remove the “lid” of the buns and place both halves cut side up. Spread both sides evenly with the olive salad. Use some of the juices too, as they’ll absorb into the bread for extra flavor.
Step 2: Layer on the cold cuts
On the bottom layer of buns, begin shingling the cheeses and meats. I usually start with the cheeses, but really, it doesn’t matter. The photo here illustrates the progression of layers: of course, you want the cheeses and meats layered all the way across the surface of the buns.

Carefully flip over and place the top half of the buns over the stacked meats, being careful not to dislodge too much of the olive salad.
Step 3: Butter the slider tops
Mix melted butter with garlic powder and brush generously over the tops of the buns. Immediately sprinkle sesame seeds into the melted butter.

Step 4: Bake and serve
Bake until the buns are golden brown and the cheese is melty and starts to ooze out the sides.

If you used a baking sheet with rims, for easier slicing, lift the entire block of sliders out of the baking sheet with the parchment paper and place on a flat surface.
Use the long serrated knife to carefully cut the sliders apart at the seams. Take advantage of the sharp serrates of the blade by drawing the knife horizontally through the layers of meat in short see-saw motions, rather than chopping up and down. Use your free hand to hold the buns in place once you’ve separated some of the sandwiches — they’ll want to pull apart, otherwise. Serve immediately.
Cook’s Notes
- Do you serve the sliders hot or cold? Like many aspects of a muffuletta sandwich, this is up for fierce debate, but first of all, there’s no wrong answer. And second, for my tastes, hot is always better. I’ll always go for the thing that creates melty cheeses. At a party, they’ll cool down to room temp, but the buns will still be toasty and the cheese ever so slightly gooey.
- If your slider buns are not already split, you’ll need to slice the buns in half through the center. Brands like King’s Hawaiian are easy to slice because the buns are attached in one big block. If you have a long, serrated bread knife, you can set up height guides — like long-handled wooden spoons — on either side of the block to help get a clean, even cut through the buns, leaving the tops attached to each other, and the bottoms attached to each other. This makes it super quick to spread the olive salad on the bread, rather than doing it individually for 24 bun halves.
- I can already feel it: muffuletta sandwich purists are going to get hot under the collar about not using authentic bread. A soft slider roll is very much not authentic. But I’ll assert that that’s okay. If you have access to traditional muffuletta bread, go for it!
- It’s tradition to serve muffuletta sandwiches with potato chips. We have our own beloved local brand of potato chips here in Cincinnati — Grippo’s — so I was yesterday years old when I first learned about the Zapp’s brand. The perfect match-up, it’s said, is a muffuletta sandwich with Zapp’s Spicy Cajun Crawtators. Let me tell you, I was shocked that my Northern grocery store carried Zapp’s at all. I could only get the Voodoo variety, but they’re sooo delicious and crunchy and a wonderful accompaniment to my Muffuletta Sliders. Highly recommend the Zapp’s!
- How many layers of meat and cheese should you use? My personal preference is to pile it on thick, but I’m also going to be honest here: These deli meats are expensive, and when I had all of the deli items in my cart, it was over $30. Which produced about two layers of everything (with leftover cheeses). Tummy-wise, I could’ve easily gone with another layer of meats, but my wallet said hold. I would imagine that there are regional price disparities and that some of you can find these cold cuts at much better deals.

In terms of meal-level appetizers and party foods, I think sliders are probably my favorite. Even over chicken wings (gasp!). They’re not messy, they can be held in one hand. And they leave plenty of room for all of the other party food goodies that you’ll be serving your hungry guests.
Enjoy a taste of the Big Easy in a sweet little package!

Muffuletta Sliders
Helpful Equipment
Ingredients
- 12 slider buns (I used King’s Hawaiian)
- 8 ounces Muffuletta olive salad or Italian olive salad
- 6 ounces sliced Swiss cheese
- 6 ounces sliced Provolone cheese
- 4 ounces sliced Mortadella
- 4 ounces sliced Coppa, Speck, or Prosciutto
- 4 ounces sliced Sopressata salami sweet or hot (your choice)
- 4 ounces sliced ham
- 1 tablespoon butter
- 1/4 teaspoon garlic powder
- sesame seeds
Instructions
- If your slider buns are not already split, slice the buns in half through the center. If you’re using buns that are attached to each other in a block, leave them attached, so you have a sort of sheet of tops, and a sheet of bottoms.
- Divide the olive salad between the sheets of tops and bottoms and spread evenly from corner to corner on the interior sides.
- Layer the cheeses and cold cuts on the bottoms. The order doesn’t really matter; just be sure to overlap each ingredient so that there’s a nice, thick center of meats and cheeses.
- Carefully reassemble the sandwiches, turning the tops over onto the layered bottoms, taking care not to spill too much of the olive salad.
- If possible, let the sliders rest for at least 15 minutes. This will let the olive salad soak into the bread, for awesome flavor. It also helps to press down on the sandwiches: rest a small baking sheet on top of the sliders, and weigh it down with a couple of canned goods. If resting longer than 30 minutes, store in the refrigerator.
- When ready to bake, preheat the oven 350ºF and line a baking sheet with parchment paper.
- Melt the butter in a small saucepan and season with the garlic powder.
- Brush the tops of the sliders with the butter and sprinkle sesame seeds over the top.
- Bake for 15 to 20 minutes, until the buns are lightly golden.
- Slice the sandwiches apart and serve.