
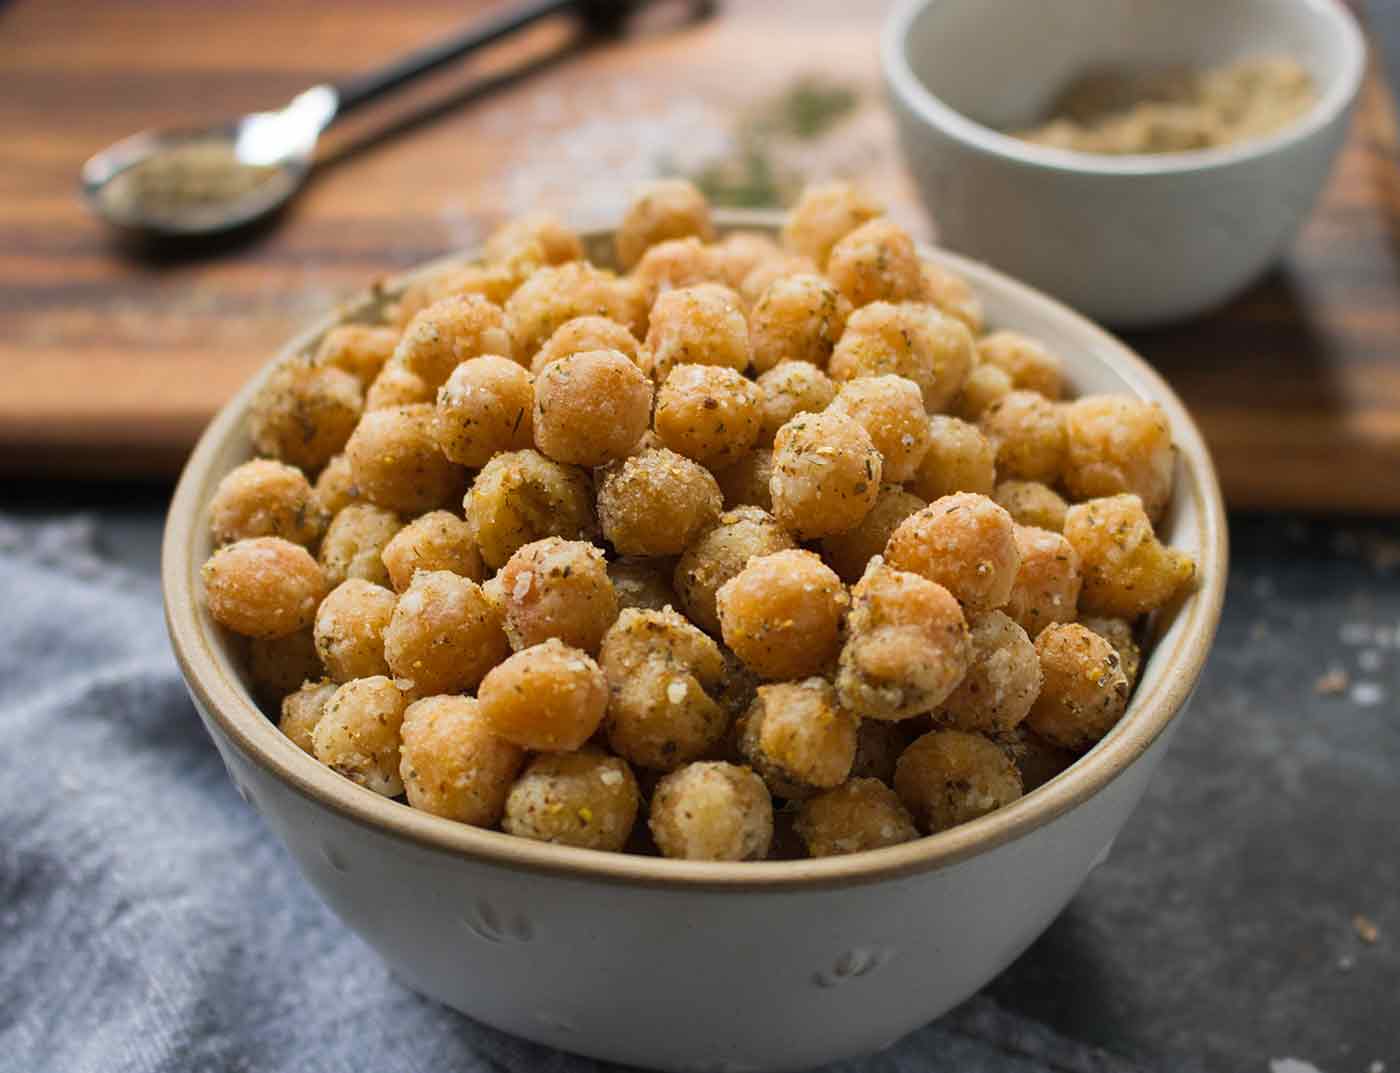
Dill Pickle Chickpeas are an irresistible snack that can be made in a matter of minutes! Perfect for game-day noshing or an evening curled up in front of a movie, you’ll enjoy the crispy crunch and pickle seasonings that create a unique and I-can’t-stop-eating-them treat.
I recently tried dill pickle peanuts for the first time. Now, I like peanuts as much as the next non-allergic person, but these seasoned nuts were like, whoaaa. They’re the nut I didn’t know was missing from my go-to afternoon snack nut mix of honey roasted almonds, roasted pecans, pepitas, and dried cranberries. Salty, savory, crunchy, a little sweet … and now dill-garlicky. So good. They’re like salt and vinegar chickpeas, but with the added charm of a pickle!
And that’s where the inspiration for these crispy fried chickpeas came from.
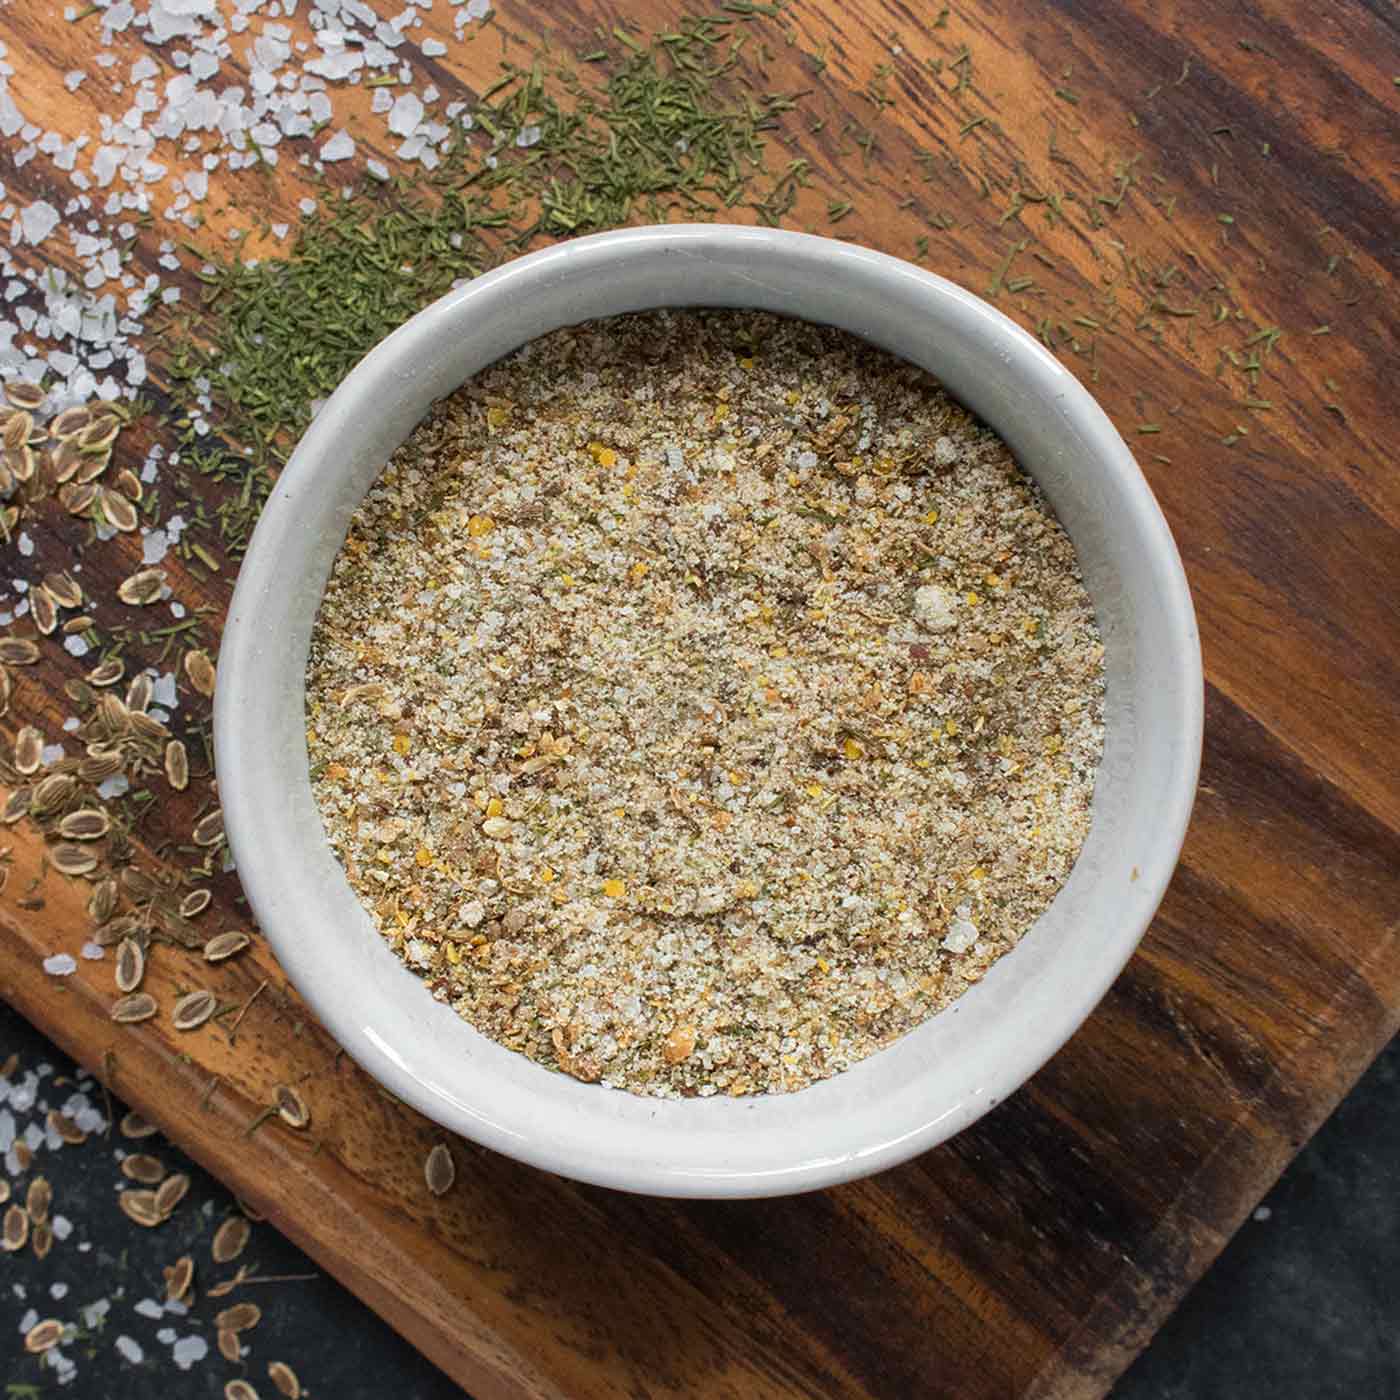
It all starts with the seasoning. As a pickler of things that grow in my garden (cucumbers, tomatoes, hot peppers, and sweet peppers), I didn’t have to dig too deeply into my recipe repertoire to come up with the ingredients for a winning spice mix.
Lots of dill, of course. Mustard seed. Salt. Garlic powder. Plus a few others. All blended into a fragrant mix positively that screams, pickle! (I have a small spice/coffee bean grinder that I use exclusively for spices.)
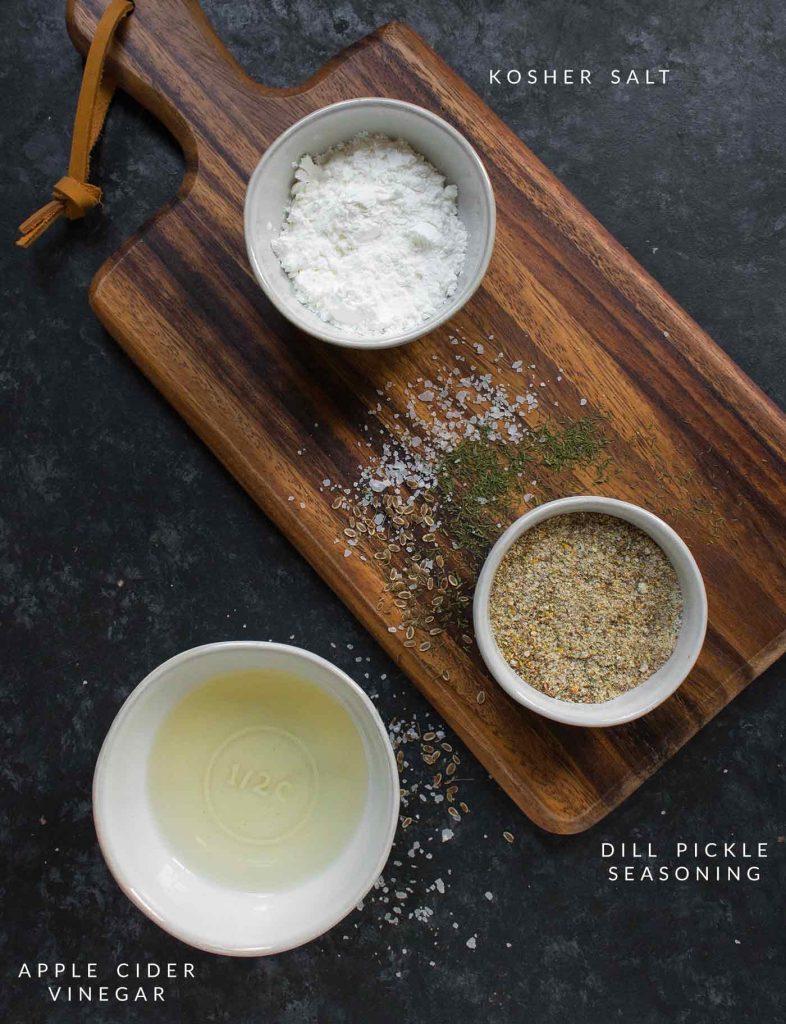
I also added one step that I think pushes these chickpeas firmly into delicious pickle territory: I soak the chickpeas in apple cider vinegar and a pinch of sugar, before frying.
It’s an optional step, but if you’re into vinegary pickles, it’s one that’s worth it. Soak the chickpeas while you’re blending up the spice mix, and you’ll lose no time at all. If you happen to have a mostly-empty jar of pickles, you can put the extra juice to good use here instead of the straight-up vinegar.

Canned chickpeas or cooked from dried?
You can use either. Yes, no guilt about using canned as a shortcut. It’s all good. But if you have the means and gumption to cook fresh from dried, I heartily recommend it.
“Fresh from dried.” Is that a thing? Lol.
Freshly cooked chickpeas taste considerably better than canned, and the texture is superior. It’s almost a different food. With a pressure cooker, it takes about a half hour (plus a little soaking time), which is a can-do situation, even during the week.

I have a mini Instant Pot that stays on my counter, which I use most days of the week for ingredient prep. Here’s how I cook dried chickpeas:
- Soak 1 cup of chickpeas in a roomy bowl, covered with 2″ of water, for a minimum of three hours (overnight is fine, too). They’ll plump significantly. Drain the soaking water.
- Add 3 cups of fresh water, 1/2 teaspoon kosher salt, plus the soaked chickpeas (and a bay leaf, if you’re feeling fancy) to the removable pot of the Instant Pot.
- Optional: add a glug of olive oil to the water. It helps keep foaming under control.
- Close the lid and seal the vent.
- Cook on high pressure for 5 minutes, and then natural release for 20 minutes. (If the unit is still pressurized after 20 minutes, go ahead and quick release the rest of it.)
- Remove the lid and drain the chickpeas through a sieve. Let cool. “Warm” is okay before proceeding with the recipe, but not burn-your-tongue hot.
This process creates a firm chickpea with a creamy center, and skins mostly intact. Perfect for dill pickle chickpeas!
If you’re interested in experimenting with other cooking times and results (say, to make hummus), I recommend Pressure Cook Recipe’s blog post that details their tests and results, with and without soaking (often the stumbling block for me – I usually forget!). There’s a handy chart you can print or save.
The process above is my tweak to their Test #4. They call for 12 hours of soaking; I’ve found 3 to be entirely sufficient. Good thing, too: I can remember to soak the chickpeas on the morning I want to cook them up, but remembering the night before is an awfully big ask!
Shallow Frying vs. Oven-Roasting
When it comes to frying vs. baking, I’m the first one to come down hard on the side of baking or oven roasting. I don’t own a deep fryer, and I don’t like dealing with large quantities of oil, either to dispose of or keep (ick). Pan frying in a very shallow pool of oil is just my speed.
Oven roasting is definitely healthier, in terms of using less oil. And oven-roasted chickpeas are the bomb, make no mistake about it: They reach a satisfying texture that makes them poppably delicious.
But for this special batch, I really wanted that crispy snap of a fried exterior … but without the mess of deep frying. I almost always use olive oil for pan-frying, but I’ve also tested this recipe with avocado oil. I think peanut oil might add too much flavor, but, the choice is up to you!
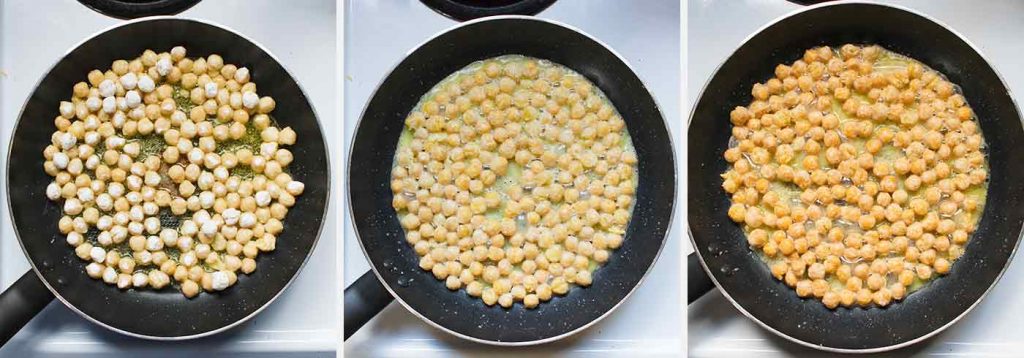
And of course, one step not to be missed is to toss the chickpeas in cornstarch before frying. This not only amplifies the crisping process, but also creates a surface that helps the spices cling more readily to the chickpeas. As they fry, you’ll notice the oil in the pan becomes almost velvety from the cornstarch, and coats the chickpeas thoroughly.
How Long Do Crispy Fried Chickpeas Store?
Dill Pickle Chickpeas are at their crispy-delicious best if consumed within 8 hours. So, don’t hesitate to make them ahead of your party or movie fest and store in an open bowl on the counter.
But because the chickpeas are not dried all the way through in the frying process, their tender insides will begin to soften the crispy exterior over time. The next day, they’ll still have some crunch, but not at the level of the day before. Storing in a sealed container will only hasten the softening process.
It’s not all bad news, though: if you’re a salty-savory snack fan like me, it’s kind of dangerous to have these things sitting around the house 24/7. Even though it’s healthy chickpeas, there’s still that whole “too much of a good thing” at play here.
And in terms of spontaneity, if you have the dill pickle seasoning already made, and canned chickpeas in the pantry, you’re only 20 minutes away from crispy snack goodness. As an occasional treat, that’s even doable as an after-school snack.

Recipe Notes:
- Make sure your spices are fresh! When I first created my recipe, it tasted decidedly and disappointingly un-dilly, lol, and I realized that my dill seed was about 18 months old. A fresh batch made all the difference!
- If you’re using dried chickpeas, make sure they’re not stale and wrinkly. You can absolutely store chickpeas for a long time, when done properly (i.e., in an airtight container, preferably with oxygen absorbers), but those flimsy plastic bags from the grocery store are not proper storage. And it’s so easy to forget how long something’s been sitting in your pantry (I do it all the time).
- I call for a “scant 1/2 teaspoon” of citric acid in this recipe, but, to my tastes, it’s really more like a 1/3 of a teaspoon. One-quarter was too little, a full 1/2 is a bit too much. Citric acid, by the way, adds a nice little puckery zap to the seasoning mix. Chickpeas don’t live in a vinegar bath the way that pickles do, so the citric acid takes care of that missing sour note. It’s a powder that’s packaged in bottles (or mylar bags, in large quantities) and can be found in the canning section of the grocery store. Or sometimes the health supplements section. And of course you can order it from Amazon.
- The seasoning recipe makes more than you’ll need for just one batch. Store the leftovers in an airtight jar for the next time!
I hope you’ll love these crispy-fried Dill Pickle Chickpeas as much as I do. Sometimes recipe testing for the blog is not my mostest favorite thing in the world, but making these chickpeas for three days straight was far more reward than duty.
If you’re a seasoned chickpea fan in general, also check out my recipe for smoky oven-baked chickpeas!


Dill Pickle Chickpeas
Ingredients
for the dill seasoning:
- 1 tablespoon coarse kosher salt
- 2 teaspoons dill seed
- 1 teaspoon dried coriander seeds
- 1/2 teaspoon whole mustard seeds (yellow or brown)
- 1/2 teaspoon dried dill leaves (a.k.a., dill weed)
- 1/2 scant teaspoon citric acid (available in the canning aisle, or vitamin stores, or order online)
- 1/2 teaspoon onion powder
- 1/2 teaspoon garlic powder
for the chickpeas:
- 1/4 cup apple cider vinegar or pickle juice from a jar of pickles (optional)
- pinch of sugar (if using vinegar)
- 15 ounces cooked chickpeas (one can), drained*
- 3 tablespoons cornstarch
- Olive oil or avocado oil (approx. 1/4 cup)
Equipment
Instructions
prepare the dill pickle seasoning:
- Add the first 4 seasoning ingredients to the bowl of a spice or small coffee grinder, and pulse until broken up (about 3 pulses).
- Let the dust settle a moment, so to speak, and remove the lid and add the remaining seasonings. Pulse to mix thoroughly. The spice blend should be just short of coarse, where the different colors of the spices are still visible (not pulverized like fine sugar).
prepare the chickpeas:
- If using the vinegar/pickle juice, toss the chickpeas with the liquid and sugar in a large bowl and let stand for 15 minutes. Drain away any excess liquid.
- Sprinkle the cornstarch over the chickpeas (in the large bowl) and shake until completely coated. Add more cornstarch if needed. Transfer the chickpeas to a sieve and shake gently over a garbage can to remove excess cornstarch.
- Cover the bottom of a large skillet with a layer of the oil, and heat on medium until shimmering.
- Add the chickpeas and fry for 5 to 10 minutes, or until golden brown on all sides (the more crowded the pan is, the longer it will). Stir or swirl the pan (carefully!) occasionally to cook on all sides. A thin spatula also works well here to flip large clusters all at once.
- Sprinkle 2 to 3 teaspoons of the dill pickle seasoning evenly over the chickpeas, shaking the pan to turn the chickpeas as you go. Sprinkle another layer of seasoning over the chickpeas and stir. (You won’t use all of the seasoning for 15 ounces of chickpeas.) Remove from heat and transfer the chickpeas to a paper towel-lined pan to cool.
- For best crispy crunch, consume within 6 hours.
Notes
Nutrition
